
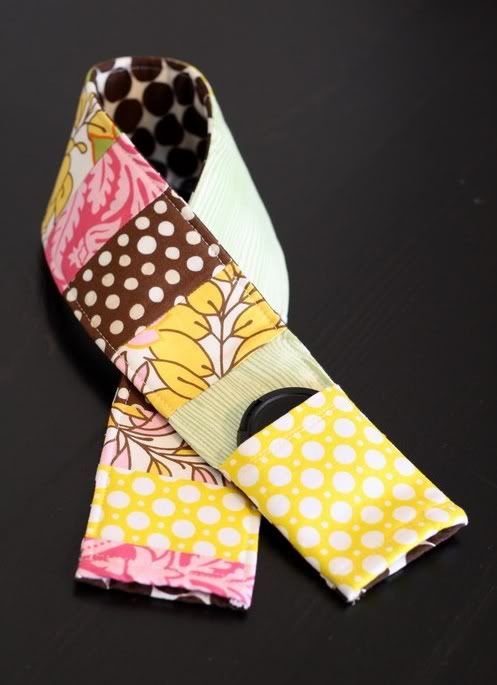
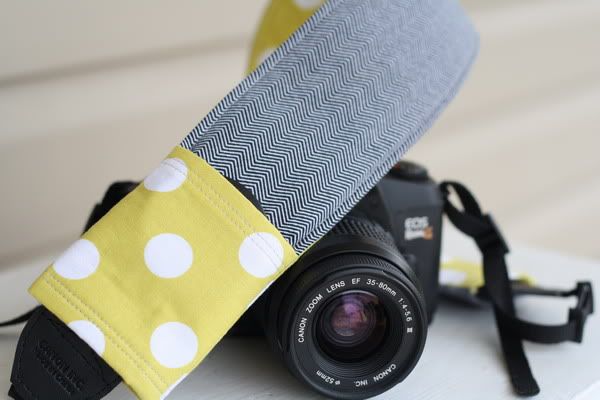
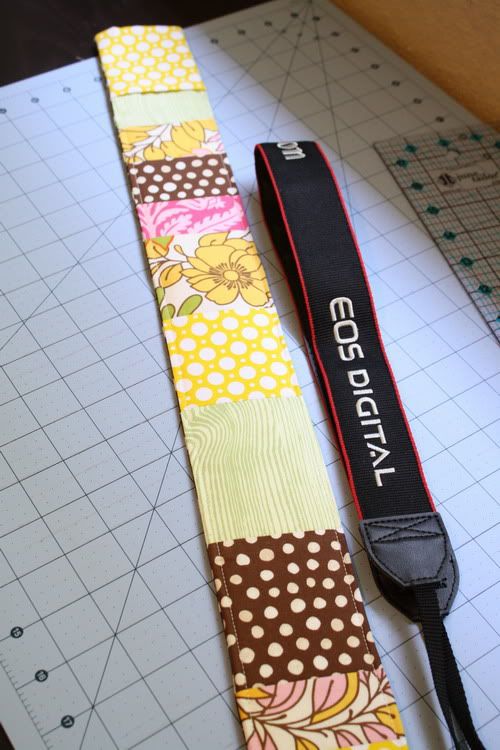
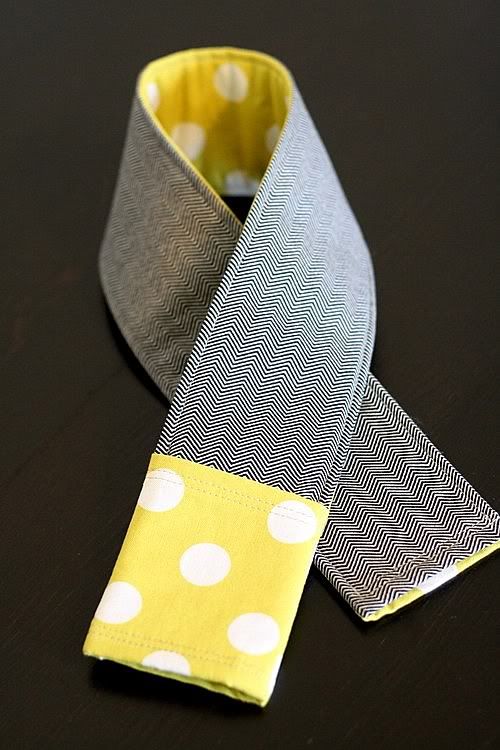
I know, I know . . . there are a ton of these tutorials out there but I thought I'd share how I made these anyways! I really like making these since they're easy, fairly quick to make, and another great way to use up scraps. Very comfy too! My new camera came with a vinyl strap (yuck) and it just didn't feel good. I made two versions yesterday, a patchwork strap and a solid strap. Here's the how-to:
Note: I made these covers to fit the standard sized strap that comes with Canon/Nikon DSLR/SLRs. Finished length is 24.5 inches (62.2 cm) and 2.75 inches (7 cm) wide.
Supplies:
Fabric (various prints for the patchwork strap or 2 prints for the solid)
Thread
Heavy Weight Fusible Fleece (I used Pellon that I got at Walmart)
Fusible Interfacing (doesn't matter what kind)
Scissors
Rotary cutter/mat (optional but suggested)
For the solid strap you'll need to cut:
Fabric: {2} 26.5 x 3.75 inches (1 piece for front of strap and 1 for back)
Pocket Piece: {1} 5.5 x 3.75 inches (I used a contrasting fabric)
Interfacing: 3.5 x 2.75 inches (layer 2 pieces if your interfacing is lightweight)
Fusible Fleece: 24.5 x 5.5 inches
For the patchwork strap:
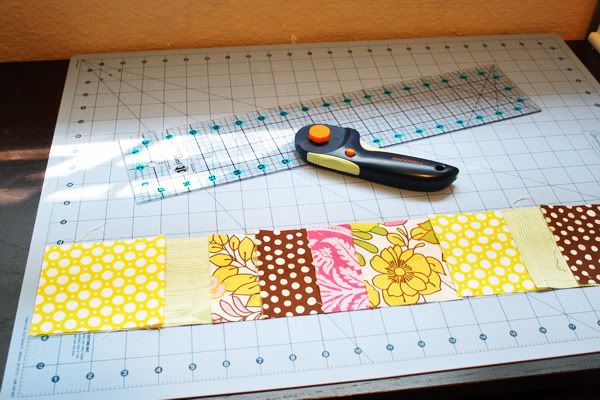
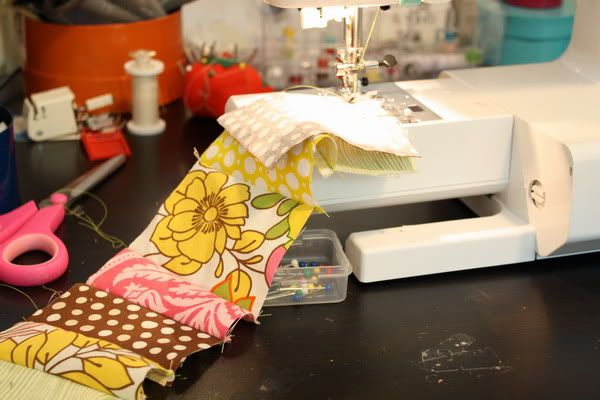
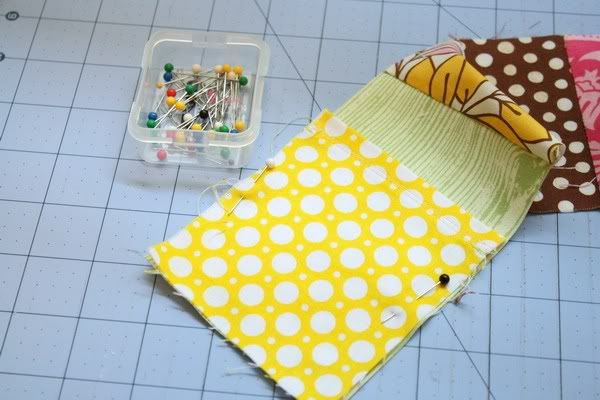
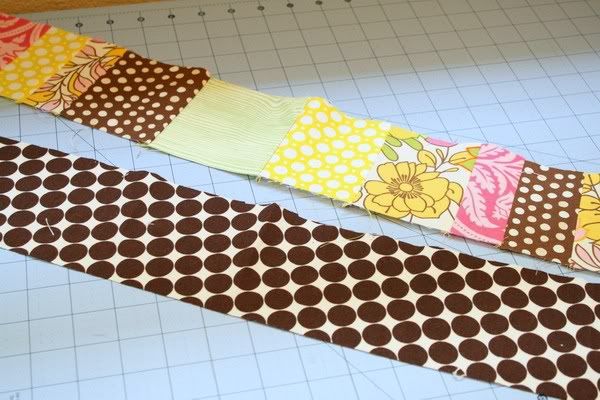
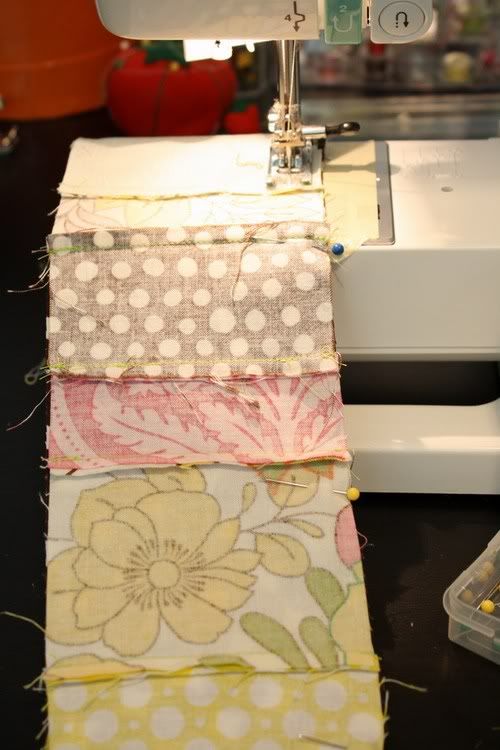
I cut different lengths of fabrics {all 3.75 inches wide) and sewed them together (along the width measurement) using 1/4 inch seam allowance to equal 26.5 inches long when completed. Start your patchwork with a piece that is 6 inches long and go from there. The 6 inch piece is where you will attach your pocket.
Construction:
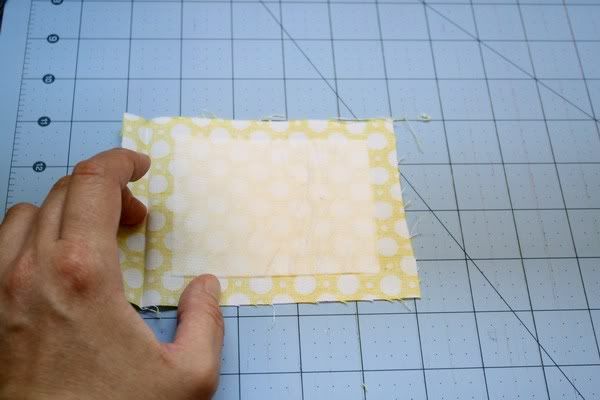
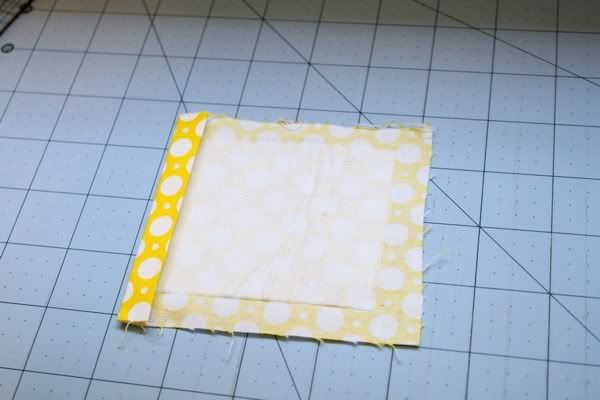
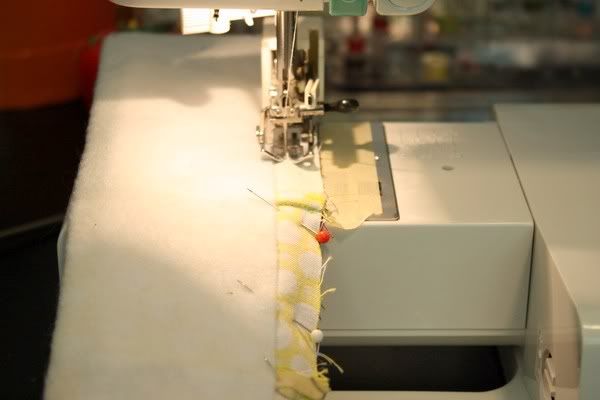
1. Once you have {2} pieces (one for front of strap and one for the back) measuring 26.5 x 3.75 inches, make your pocket piece. Center your piece(s) of interfacing on the back of the pocket piece and fuse. Fold the end over 1/2 inch and then fold again to create a finished edge for the top of the pocket. Stitch this down using two rows of stitching. Line up the unfinished edge of your pocket piece with the end of your strap piece and baste.
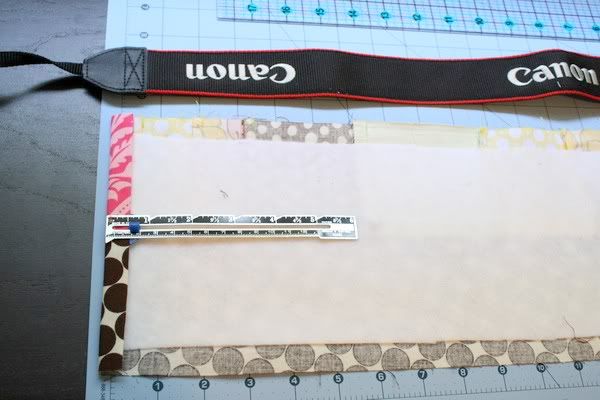
2. Lay your two 26.5 inch pieces together right sides facing and sew along one of the long edges using a 1/2 inch seam allowance. Press open seam.
3. Center your piece of fusible fleece on the wrong side of the piece you just sewed and fuse. You should have about an inch of space on either short end and 1/2 an inch on either side of the fleece. Next, fold up the short ends 1/2 inch then another 1/2 inch. Press and stitch 2 lines on both ends.
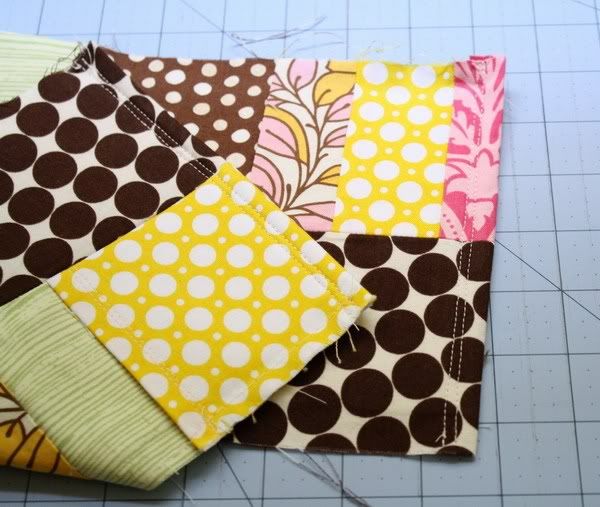
4. Now fold your strap cover in half lengthwise, right sides touching, and sew a 1/2 inch seam. Trim the seam down to about a 1/4 of an inch. Turn right side out and press, press, and press.
5. Topstitch along both long sides about an 1/8 inch from the edge. Don't topstitch across the pocket! Start (or stop) right before you reach the opening of the pocket. Press again and you're all finished. Use a large safety pin or similar item to thread your camera strap through the cover.
All finished!
If you'd like to share photos of your finished strap, I'd love to see them! Add them to the LBG studio Flickr group pool here.
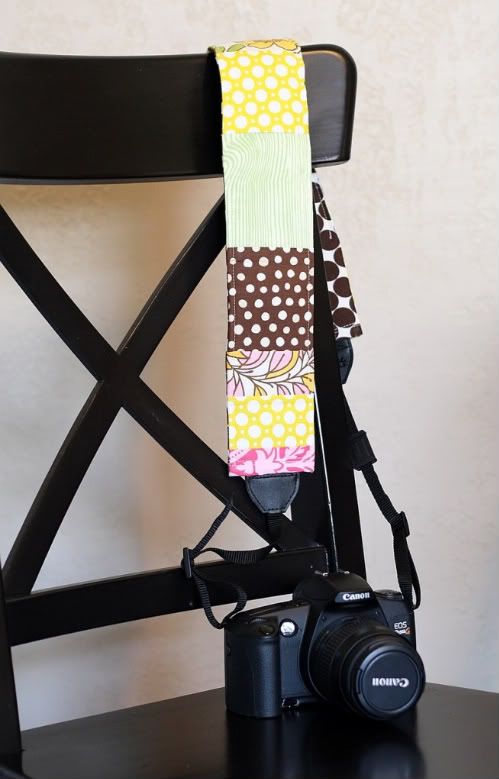
Happy sewing! And if you don't sew or are short on time, check out my shop for camera strap covers :)
this is great vanessa, I'm definitely going to have to make one for myself now - no excuses!
ReplyDeleteI love that you have a lens cap pocket. I've started photography classes and we are not allowed to keep the lens cap on. Thanks for the inspiration.
ReplyDeleteLisa
www.twininspiration.blogspot.com
I seriously LOVE your fabric choices. And the clean lines, I've seen ruffled versions, but I like the simplicity of this one better:-)
ReplyDeleteYay, can't wait to try this! I'm forever losing my lens cover :-) Thanks for the tutorial!
ReplyDeleteFabulous Idea - the pocket is brilliant! Thanks for sharing the tutorial - very well done. p.s. a new reader from Sew Much Ado!
ReplyDeleteThank you so much! This camera strap looks so delicious. The fabrics go together so well!
ReplyDeleteLove it! This will be a fabulous gift I can make for the photographer friends in my life :)
ReplyDelete!!!! I'm so in love! Do you have fabric references? I love them all so much - but especially the faux bois! i think i spy a little amy butler in the flowers and the brown sun spots...
ReplyDeleteeither way, this is next on my to do list!!
hi keri!
ReplyDeletethese are the fabrics i used (some may be tough to find though):
faux bois - joel dewberry / ginseng collection - wood grain in green
pink damask - joel dewberry / rose damask in magenta
bright floral print : robert kaufman- Vera's Garden - Summer
http://www.hancocks-paducah.com/Item--i-K-9765-193
small brown dots - monaluna mingle in cocoa
large brown dots (back of strap): Hobby Lobby
i can't track down the yellow! a lot of these fabrics came from a box of scraps a friend sent.
thank you for this great tutorial!! i made one today and it was so easy!!! love that it has a pocket!!!
ReplyDeletethanks so much for sharing the tutorial!i was just admiring them over on your flickr page :)
ReplyDeletei just got a sewing machine and a camera for christmas ... so i'm going to give this a shot! wish me luck!
ReplyDeleteThank you so much for sharing this tutorial! I was here to quickly make one for my sister in law for Christmas and am back to make another for my dad for his birthday! Incidently, my dad had lost his lens cap several months ago...I found him a new one on Amazon.com and this strap cover with pocket will go along perfectly and hopefully keep him from losing yet another lens cap!
ReplyDeleteThanks again!
Amanda
www.onegirlinpink.blogspot.com
My daughter made a strap about a year ago, I really liked it. This past March we had a trip to Washington D.C. and I was thinking how nice it would be to have pockets in my strap so I wouldn't have to carry a purse around, I surfed the internet and found several, liked yours, so started playing around as I also wanted more pockets, I ended up with 2 on each side, they hold extra batteries, credit card/ID, lens cap some cash, wanted my phone in one but it is too thick and doesn't slide in and out easily, but it was great walking around with only my camera, it started a lot of conversations, I had a lot of compliments, Thank you for taking the time to post your tutorial.
ReplyDeleteConnie
@Connie - Thank you for sharing! Glad you found the tutorial helpful. Adding those extra pockets sounds like a great idea :)
ReplyDeleteThank you for the tutorial! I loved this when I saw it (I forget where I first saw it sorry) and bookmarked it awhile ago. I got it done today during nap time. I love it! I spend a lot of time at parks with the kids and love that I can take it off and throw in the wash too. The directions were excellent, thanks again!
ReplyDeleteI Love This!!!
ReplyDeleteI love that it's padded (hate that sore neck feeling) love that it's unique and love that it's so easy to make...
Only prob is that my lens cap is 3 inches in diameter so really have to squeeeeze it in :-( Not to worry, shall make another but make it a fraction wider to accommodate the cap!!
Thanks, Jenn
I made one finally!!! I found you on Pinterest! Thanks so much for the great tutorial!!! I did a post about it too! http://livingthegoodlife5.blogspot.com/2011/08/camera-strap-for-my-nikon-d90.html
ReplyDeletethanks for sharing your tutorial...I made one for myself and love it! I've gotten a ton of compliments on it...someone said, "oh, I like your camera strap....it looks like one of those etsy finds!" Made me smile. Thanks for your generosity!
ReplyDeleteThanks for this tutorial! I have been meaning to make myself a camera strap forever - no more excuses!
ReplyDeletePerfect gift for Hubs for Christmas (albeit maybe in more subdued fabrics!!) LOL Thank you so much for the idea! :)
ReplyDeletethat's a very helpful tutorial. i need such a strap, because i'm tired of searching the lense cap all the time.
ReplyDeleteI linked to your tutorial on my blog - thanks for sharing!
doro K.
Great tutorial - very clear and very easily adaptable, love the wee pocket for the lens cap as well. I like it so much I've made three and posted the link on my blog! No more sore necks and boring camera covers! Thanks so much.
ReplyDeletehttp://apocalypsebakery.wordpress.com/2012/01/24/camera-strap-covers/
This is such a cool idea, thanks so much for sharing!
ReplyDeleteOff to figure out inches lol
Trying to pull up the camera strap tutorial but none of the pictures are loading - I am so new to the sewing game, so I need pictures. :) Any ideas?? Thanks!!
ReplyDelete@Gina - They're showing up for me! Maybe it's your browser?? Sorry you're having trouble with it.
ReplyDeleteThanks so much for posting such a great tut! My friend lended me her "old" camera and guess what I will make ;)) (and another one for my friend of course!)
ReplyDeleteThe 2 you made are just plain gorgeous...
Josée
This is a GREAT tutorial. I love sewing projects and this is high quality and looks super professional! I love the fusible fleece in this! I just finished mine and it is far better than any other I have owned or made! thank you so much!
ReplyDeleteMade one of these for my camera. I hate that the strap hurts the back of your neck. Had been meaning to make this for a while now, but i will be leaving on a mission trip next week and thought i better get busy because my camera may not leave my neck. Loved the pocket. I put one on each end. Wish I had made one a little larger to hold keys/bank card. oh well it was so easy once i got started i can always do another!
ReplyDeleteI am excited to make one of these. But I had a question is the heavy duty fusible fleece for comfort, for the form or for both? The reason I ask is because I bought a comfortable strap but I just wanted to make it look cute, so I wasn't sure if I still needed to use the fleece if I didn't need the comfort aspect of it. Thanks, excited to try it out!
ReplyDelete@Season - The fusible fleece is mostly for comfort but also helps the cover "grip" the actual strap so it doesn't slide around too much. Not sure what material your strap is made from-may not be an issue for you. I would use fusible interfacing in place of the fleece if you don't need the padding so that the strap cover has a bit of structure :) Hope that helps!
ReplyDeletegreat tut ... love the ones you made; the pouch for the lens makes it perfect ... i made a couple of these before going to hawai'i (kona, big island) with hubbs, daughter, hubbs and their 6 (count em, six!) kids a couple of years ago ...
ReplyDeleteone thing that i did, though, was sew the strap to both ends of the canon strap ... that way the strap did not slide around and, when you wanted, you could just release the stitches (otherwise knows as *picking out stitches ... LOL ... they were something like ... 4mm long, not the regular stitch, 2.5) ...
again, thanks so much; we need new ones ... hopefully we're all heading back to hawai'i soon/next early spring! ..... darlene
Love this! I literally had never sewn a stitch in my life and was able to follow your tutorial. Great job! Linked to your tutorial at http://newlattelife.blogspot.com/
ReplyDeleteI just love the lens cover pocket! Definitely have to add that to my next camera strap.
ReplyDeleteThis is Great Work....
ReplyDeleteClick Here
Great Work....
ReplyDeleteHave a Look Here
This is great! Just a heads up..pinterest gave me a warning that this blog may have questionable material ... but i dont see any.
ReplyDeleteThis is great! Just a heads up..pinterest gave me a warning that this blog may have questionable material ... but i dont see any.
ReplyDeleteHey Marcy - thanks! Yep, Pinterest shows that warning because that pin most likely links to my old url which then redirects to my new custom url. Unfortunately, there's nothing I can do to get them to stop posting that warning message.
DeleteThats unfortunate! I will comment on my pin that its safe to visit. :)
DeleteThats unfortunate! I will comment on my pin that its safe to visit. :)
DeleteThanks, Marcy!
DeleteHi! Thank you for the tutorial! Sometimes I struggle a bit following tutorials, and I'm a bit confused on the lens pocket part- if you use fusible interfacing, with a 1-inch segment of fabric on either side, then fold it 1/2" and 1/2" again, aren't you fusing your top edge back down to the interfacing? If so, how do you sew the two finishing lines? (I've read you're not supposed to sew on fusible interfacing...) is it just folded down once, not again onto the interfacing? Help! :)
ReplyDeleteHey Meg,
DeleteYou can absolutely sew through fusible interfacing! I think you may be thinking of something else (Steam a Seam, maybe). I sew through multiple layers of fusible interfacing anytime I make bags, wallets, camera strap covers, etc. I usually use Pellon 911F but there are many different kinds to choose from and you can sew through any of them. So, yes, the top edge of the pocket piece folds back over to cover the interfacing on the back and you sew through all those layers. If your sewing machine has problems sewing through thicker layers, make sure you're using the appropriate needle size -for this project I usually use a 14 or a 16.
Thanks so much! :)
DeleteThanks SO much! I was trying to figure out how to make one as a Christmas gift and couldn't figure out how to do it! Thanks for the free tutorial!!!
ReplyDeleteThanks!!!!!
Thank you!! - Repinning - I've been looking for this!!
ReplyDeletehttp://jesscarleton.blogspot.com/2013/01/rainbow-cover.html
ReplyDeleteThanks for the tutorial...here's mine, and I'll flicker it as well.
I love this pattern! I made one in about an hour using scraps from a purse project. My camera is so stylish now! ;)
ReplyDeleteI featured your tutorial in this post about keeping track of lens caps: http://www.katiebennettphoto.com/1/post/2013/12/3-ways-to-keep-track-of-your-lens-cap.html
ReplyDeleteThanks for the lovely tutorial!
Just found your tutorial through a google search. I'm wondering if the strap moves around, up and down etc? Or if I should taper the ends to hold if more securely? I'm planning on making one for me and one for a daughter for Mother's Day. Thanks for generously sharing your tutorial!
ReplyDeleteHi! The strap cover may slide a little bit but for the most part it stays put. The textured surface of the fleece used inside the strap cover grips the vinyl of the strap. I'm not sure that I would taper ends as that means your pocket won't hold much of anything. You could omit the pocket and make the cover narrower if you want but it will be tricky to turn right side out after sewing it.
DeleteLove this tutorial! Have you experimented with non fusible fleece? or with doubling up on the fabric instead? I am prepping to teach some women how to make the camera strap covers. They don't have access to electricity or an iron. Many Thanks, Debi @ dklaird@hotmail.com
ReplyDeleteMy new camera came with a vinyl strap (yuck) and it just didn't feel ... cameraschildren.blogspot.com
ReplyDeleteCongratulations! This post is featured as Pin of the Week over at Diana Rambles dot com. Come take a look at what I liked about it. I'm sharing this via Pinterest, Twitter, Google+, and Facebook! There is a Pin of the Week grab button on the sidebar.
ReplyDeletemerry christmas messages
ReplyDeletemerry christmas messages
merry christmas greetings
mothers day quotes
mothers day messages
mothers day poems
fathers day quotes
fathers day messages
fathers day poems
short christmas quote
Funny valentines day quotes
Funny valentines day quotes
Christmas Greetings
Christmas Wishes Images
Christmas Messages
Best Christmas Quotes
valentines day quotes
funny valentines day quotes